










To start selling on Temu, register through its official Seller Center, complete verification, prepare your products, and establish a reliable order fulfillment process.
Temu provides a United States seller registration route, but you should confirm the requirements and commercial terms presented for your locati0n before committing inventory.
This step-by-step guide explains how to prepare your application, build a useful product listing, calculate a sustainable price, and launch with a manageable test catalog.
Step 1: Can you sell on Temu from your locati0n?
Start by checking the country selector in Temu’s official Seller Center and choosing where your business is registered or where you reside, as applicable. The registration page includes a United States seller option; use the application route that matches your actual circumstances rather than selecting another country to bypass requirements.
Before applying, decide who will own and operate the account. If you already run a business, gather its legal details rather than applying with inconsistent personal information. If you intend to apply as an individual, check whether that option appears in your selected registration route.
Build a short readiness checklist:
- Account ownership: Identify the person authorized to submit information and respond to verification requests.
- Product sourcing: Keep supplier details, invoices, and any relevant authorization records together.
- Inventory locati0n: Know where goods will be stored and who will prepare shipments.
- Operational capacity: Assign responsibility for orders, customer issues, returns, and bookkeeping.
Treat registration as the beginning of an operating relationship, not proof that every product you own is suitable to list. Your first goal is to establish whether you can meet the requirements consistently.
Step 2: Prepare your verification documents
Temu’s published onboarding information lists business details such as business type, legal name, EIN, and registered address. It also describes identity checks for relevant individuals and accepts certain address documents, including bank statements and utility bills. Follow the exact document list shown in your application, since requirements depend on the applicant and registration route.
Create a secure application folder before opening the form. Compare the spelling, address, and identification details across your records. Where something differs, resolve it or prepare an explanation through the appropriate support channel instead of guessing which version to enter.
Use this document-quality check:
- Upload complete, readable files rather than cropped screenshots.
- Check that identification documents have not expired.
- Keep names and addresses consistent with the supporting records.
- Make sure the person submitting the application has permission to provide the information.
- Store sensitive documents securely and submit them only through verified channels.
Avoid sending identity records to an unsolicited contact who promises guaranteed approval. Navigate to the official Seller Center yourself and use its available support options if you need help. Keeping account access under your control is more important than saving a few minutes during registration.
Step 3: Register your account and complete onboarding
Open Temu’s official Seller Center and create an account using the available email or phone registration option. Its published onboarding sequence includes submitting business and seller information, adding store details, and completing verification. Use the live application as your source of truth for the fields and sequence you must complete.
Choose a strong, unique password and use contact details you actively monitor. For a business account, consider an email address that remains accessible if staffing changes. Record who controls the account and how access will be recovered if the primary operator becomes unavailable.
When entering store information, choose a name you are entitled to use. Prepare a clear logo and accurate contact details without implying an affiliation with another brand. Your store identity should be recognizable, but it does not need elaborate design work before you have validated your products.
Before submitting, review each field against your documents. Save confirmation messages and check for follow-up requests. If verification requires clarification, respond to the specific issue rather than repeatedly changing unrelated information or opening duplicate applications.
Step 4: Select a small, workable launch catalog
Start with products you understand and can inspect, describe, pack, and replenish confidently. For your first launch, prioritize operational simplicity over catalog size. A smaller assortment gives you room to check the entire process before increasing order volume.
Compare candidate products using a practical scorecard:
|
Factor |
What to examine |
Launch decision |
|---|---|---|
|
Product condition |
Inspect samples and packaging |
Resolve defects before listing |
|
Shipping effort |
Measure packed dimensions and weight |
Obtain realistic fulfillment estimates |
|
Buyer clarity |
Check sizing, compatibility, and contents |
Choose products you can explain precisely |
|
Supply reliability |
Review stock availability and replenishment |
Avoid promising uncertain inventory |
|
Financial viability |
Model costs and possible returns |
Reject products with fragile margins |
Check product permissions before investing in content. Temu reports screening listings for prohibited or noncompliant products and rejecting listings identified as violating applicable requirements. Do not assume that a similar item appearing elsewhere establishes that yours is eligible.
For branded goods, retain sourcing and authorization records where relevant. Temu also describes proactive screening and removal of potentially infringing listings, so treat product designs, brand references, and listing images as compliance concerns rather than decorative details.
If you cannot establish a product’s suitability, pause that item and investigate. A different launch product is preferable to building your opening strategy around an unresolved restriction.
Step 5: How much does it cost to sell on Temu?
Temu’s published seller information states that local seller registration is free. That does not establish your total selling cost: before launching, check the commercial terms available for your account, including any applicable charges, promotional contributions, shipping responsibilities, returns, and settlement conditions.
Build your pricing from expected retained revenue, not the headline selling price. Use a worksheet for each product and keep assumptions visible so you can update them after real orders.
Include these cost categories:
- Product cost: Purchase or manufacturing expense and the cost of getting stock ready for sale.
- Packaging: Mailers, cartons, protective materials, labels, and inserts where appropriate.
- Fulfillment: Picking, packing, storage, and outbound delivery.
- Account-specific charges: Any amounts required under your actual seller terms.
- Promotion: Discounts or advertising expenditure you choose or agree to fund.
- After-sales allowance: A planning estimate for returns, damaged stock, replacements, and support work.
A useful planning formula is:
Estimated contribution per order = expected seller revenue − product cost − fulfillment − packaging − applicable charges − promotional spending − after-sales allowance.
This is a management estimate, not your final accounting profit. Keep fixed overhead and tax planning separate, and ask an accountant how to treat them for your business.
Also map cash timing. Record when suppliers need payment, when shipping costs arise, and when funds become available under your seller terms. A product can appear profitable on paper while requiring more working capital than you can comfortably provide.
Step 6: What makes a strong Temu product listing?
A strong Temu product listing helps a buyer understand exactly what the product is, whether it fits their needs, and what will arrive. Build it around accurate specifications, clear photographs, meaningful variations, and a description that answers likely purchase questions. Use the required fields and content rules shown in your seller account when preparing the final listing.
Write titles and descriptions for a real purchase decision
Draft the title around the product type and its most important identifying details. A useful working pattern is: product type + material or defining feature + size or quantity + relevant use. Include only details that genuinely describe the item, and adapt the draft to the permitted format.
For example, an illustrative title such as “Stackable Plastic Drawer Organizer, Small, Set of Four” communicates more than “Amazing Premium Organizer.” Do not add a material, quantity, or feature unless you have verified it. Avoid competitor names, unsupported superlatives, and unrelated search terms.
Structure the description around practical information:
- What the product does and who might use it.
- Dimensions, materials, and other verified specifications.
- Exactly what the package includes.
- Relevant compatibility or fit information.
- Care, assembly, or usage instructions.
- Important limitations and warnings where applicable.
Replace vague benefits with usable detail. Instead of saying an organizer “fits anywhere,” provide its measurements and ask buyers to measure their available space. That gives shoppers a concrete basis for deciding.
Make images and variations unambiguous
Plan photographs that show the actual product, its important details, and the complete package contents. Include a scale reference or dimension graphic when size is difficult to judge. Follow the image requirements presented for your listing rather than assuming one marketplace’s specifications apply everywhere.
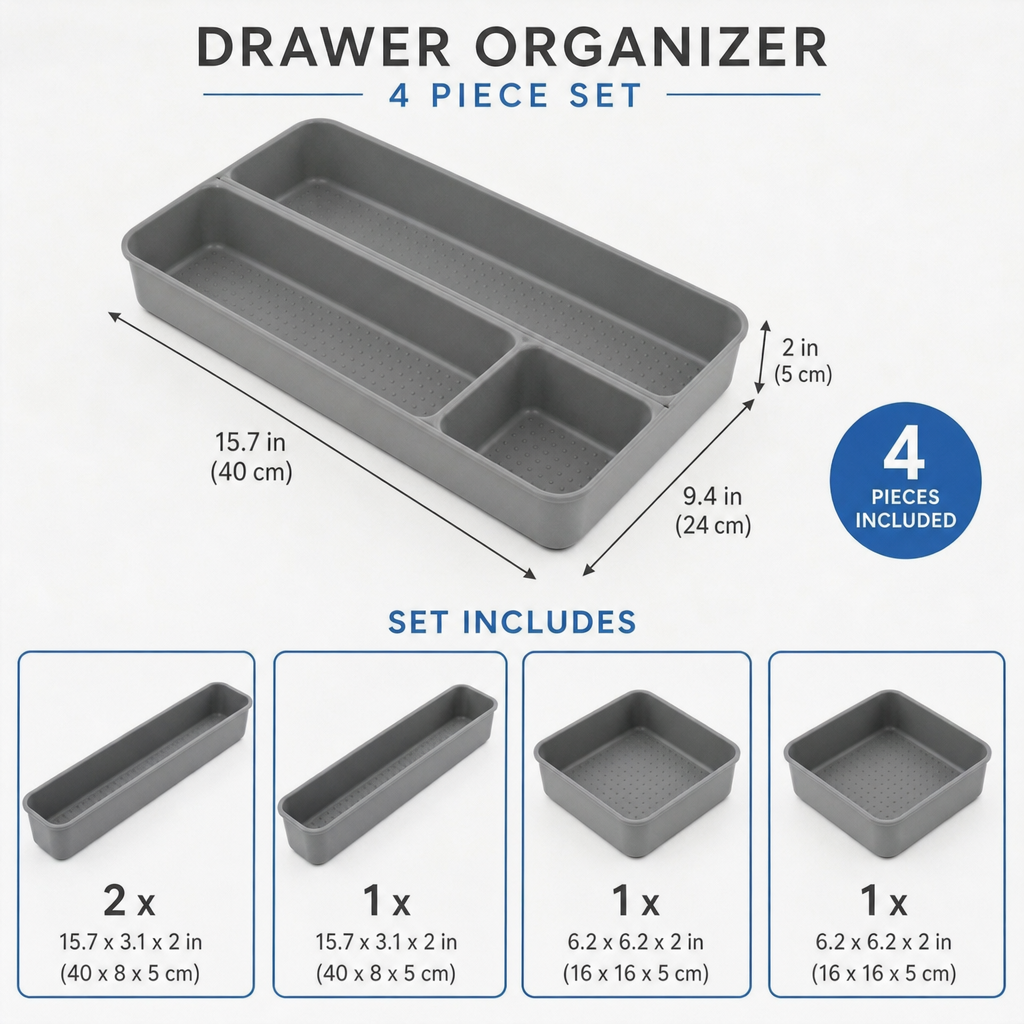
Use this as a shot-planning concept, not a substitute for photographs of your own merchandise. Separate styling props from included accessories through clear captions and composition. If a product needs assembly, consider showing both the supplied components and the assembled result.
Give each variation a distinct internal SKU and verify its image, stock quantity, and description. Check every selectable option before publishing. A well-written parent listing cannot compensate for a blue option linked to a red product photograph.
Step 7: Establish fulfillment, inventory, and returns workflows
Decide how an order will move from notification to carrier handoff before making inventory available. Temu’s US seller page states that it does not provide logistics services directly and instead offers integrated logistics solutions. Check the options and obligations available to your account rather than assuming the marketplace will store, pack, or ship your goods.
Write a simple operating procedure covering:
- Order review: Check new orders and identify exceptions requiring action.
- Stock allocation: Reserve the correct SKU and variation.
- Picking and inspection: Confirm condition, quantity, and included components.
- Packing: Protect the item and verify packed dimensions and weight.
- Dispatch: Use the approved process and record the required shipment information.
- Exception handling: Assign responsibility for delays, failed delivery, and damaged parcels.
Pack a sample order from start to finish. Time the work, check label readability, and confirm that the final package matches your shipping estimate. Use what you learn to adjust staffing, packaging, or product selection before launch.
For returns, identify the receiving locati0n, inspection process, and person responsible for decisions. Read your seller-side obligations rather than inferring cost allocation from the customer-facing shopping experience. Keep records of item condition and the resolution reached.
If the same stock serves several channels, establish one inventory record as your operational reference. Reserve a sensible buffer if you are unsure how quickly stock changes will be reflected across systems. Review discrepancies before increasing the quantity offered for sale.
Step 8: Connect existing systems where appropriate
If you already sell through Shopify, its official documentation describes a Temu sales channel that can sync products, inventory, orders, fulfillment details, and tracking between the systems. It also describes return and refund management through the channel. Check its current setup requirements and supported functionality before deciding whether it suits your operation.
Do not connect your entire catalog immediately. Start with one representative product and inspect what transfers correctly. Pay particular attention to variation mapping, stock locations, product attributes, and whether changes made in one system affect the other as intended.
Create a short integration test record:
- Which system owns product descriptions and pricing?
- Which locati0n supplies the available inventory?
- Where will staff see and process new orders?
- How will shipment and tracking updates move between systems?
- Who will investigate failed or incomplete synchronization?
For a small catalog, a controlled manual workflow may be easier to understand initially. For a larger operation, investigate supported integrations before repetitive work becomes difficult to manage. Either way, keep a documented fallback process so an integration problem does not leave orders unattended.
Step 9: Publish a controlled pilot and review performance
Launch only the products that pass your preparation checks. Give the pilot a defined inventory allocation, spending limit, and review schedule. The purpose is to learn whether the offer works operationally and financially—not simply to produce the largest possible opening catalog.
Before publishing, use this final checklist:
- Account: Required onboarding tasks and account notices have been reviewed.
- Product: Eligibility questions and requested documentation are resolved.
- Content: Titles, specifications, photos, contents, and variations agree.
- Pricing: The worksheet reflects the actual seller terms and fulfillment plan.
- Inventory: Available quantities match stock you can fulfill.
- Service: Someone owns daily order monitoring and exception handling.
- Returns: Receiving and inspection procedures are ready.
After launch, inspect the customer-facing listing wherever available. Check the displayed variation choices, images, and product details against your source records. Correct factual problems promptly rather than waiting for a sales review.
Track the measures available in your account alongside your own costs. Useful review categories include product exposure, visits, orders, cancellations, returns, fulfillment effort, and estimated contribution. Avoid treating a single early order—or a quiet opening period—as enough evidence to expand or abandon the channel.
Diagnose one issue at a time. If exposure is limited, review eligibility, category placement, and available visibility options. If shoppers visit without purchasing, examine price, clarity, and fit. If orders produce disappointing returns, investigate the product promise and actual delivered experience before adding promotion.
Step 10: Improve the offer before expanding
Use the pilot to identify the smallest change that could improve the outcome. Rewrite a confusing specification, add a missing measurement, strengthen packaging, or remove a troublesome variation. Record the change and review subsequent results before making several more adjustments.
Set your own expansion criteria before increasing stock. You might require accurate inventory records, a workable packing routine, resolved customer issues, and a contribution estimate that remains acceptable after actual costs. The appropriate thresholds depend on your business; do not borrow another seller’s targets without checking the assumptions behind them.
Keep promotion separate from product correction. More visibility is not a substitute for accurate content, reliable supply, or viable pricing. If the offer only works under assumptions you cannot sustain, revise it or stop that product.
For platform-specific learning, Temu’s Seller Academy offers materials covering listings, pricing, and fulfillment. Use those resources alongside the rules and notices available in your account, especially when changing your operating model or adding unfamiliar products.
Common mistakes to avoid during your first launch
The most useful safeguard is a written decision process. Keep the reasons for choosing each product, your cost assumptions, and the checks completed before publication. That creates something concrete to revisit when results differ from expectations.
Watch for these avoidable shortcuts:
- Pricing from competitors alone: Use competing offers as context, then calculate whether your own cost structure supports the price.
- Copying listing content: Create your own descriptions and use images you are entitled to use. Temu reports screening listings for potential intellectual property infringement.
- Launching uncertain stock: Offer quantities you can account for, not inventory you merely hope to obtain.
- Ignoring support time: Track the work required to answer questions and resolve problems alongside direct expenses.
- Expanding too early: Fix recurring packing, stock, or content errors before adding more products.
- Assuming account terms are universal: Check your own fees, settlement rules, and fulfillment obligations before making commitments.
Keep a change log as you learn. Record the issue, action taken, date, and outcome so decisions are based on your operating experience rather than memory. This also makes handovers easier when another person starts managing the account.
Build a repeatable process before chasing volume
Learning how to start selling on Temu is not just about completing an application. The practical work is choosing suitable products, creating accurate listings, understanding your economics, and handling orders consistently.
Start with one well-prepared product or a small coherent range. Verify your account terms, finish the launch checklist, and review real costs before expanding. A controlled launch gives you a clearer basis for deciding whether to sell on Temu at a larger scale—and what must improve first.
Frequently Asked Questions About How to Start Selling on Temu
What are the requirements to sell on Temu?
To sell on Temu, you must register through the official Seller Center, verify your identity, and prepare your products according to the platform's guidelines. Requirements may vary based on your locati0n.
Is there a fee to register as a seller on Temu?
Registration as a seller on Temu is free, but there may be additional costs associated with product listings, shipping, and other operational expenses.
How do I create a successful product listing on Temu?
A successful product listing should include a clear title, detailed descriptions, high-quality images, and correct specifications. Make sure to follow Temu's content rules and focus on providing valuable information for potential buyers.
How can I manage inventory and fulfillment when selling on Temu?
Establish a clear workflow for order management, including stock allocation, packing, and dispatching. Ensure that your systems are well-organized to handle returns and customer inquiries efficiently.
What are common mistakes to avoid when starting to sell on Temu?
Avoid relying solely on competitor pricing, copying listing content, launching products with uncertain stock, and expanding too quickly. It’s crucial to learn and adapt your strategies based on real experiences.